|
<< Click to Display Table of Contents >> Controller Setup Detail |
  
|
|
<< Click to Display Table of Contents >> Controller Setup Detail |
|
Controller Setup is used to set controller properties like the communication type, controller constraints, Flow Meter Settings, Omit by Date Settings, Master valve types and the Microclimate used.
TIP: It is highly recommended to configure the PC communications ports before setting up controllers.
From Laguna desktop,
1.Click on the Setup menu. Select Controller.
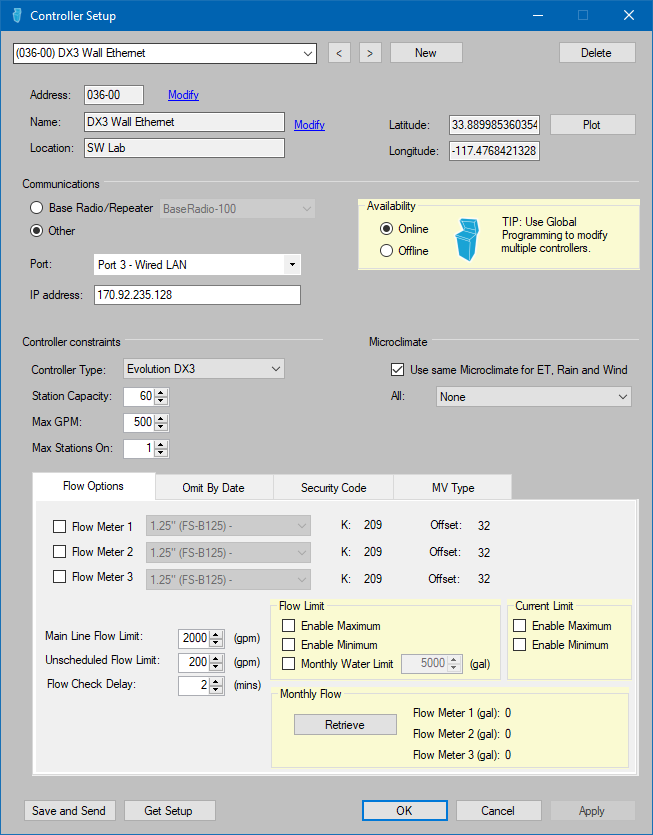
Communication Options can easily be set/reset. Once Ports are assigned to particular communication types, a controller can be assigned to the correct path by selecting it from the Port drop-down.
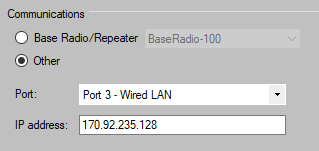
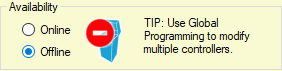
Online/Offline – When a controller is set to Offline, communications to that controller is disabled completely. An Offline will not generates alarms even with during Scheduled Events. Use the Offline setting when controller are known to have issue and need to be repaired.
Offline controllers can be easily located on the map, offline controllers have the badge show above.
Controller Constraints identify the type of controller to Laguna. It is very important to make sure that the controller type and station count is correct and matches the field.
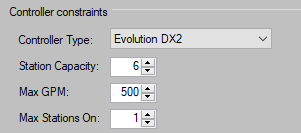
Controller Type can be DX2, DX3 or Evolution.
IMPORTANT: Migrating a controller from a DX2 to a DX3 is a one-way process i.e. you cannot revert a configuration back to DX2 or Evolution. For this reason, we recommend you make a site backup before migrating.
Controller Microclimate Setup
It is possible to use weather inputs from different sources for an individual controller. “Use same Microclimate for ET, Rain and Wind” is selected by default. To use different sources such as ZipET and an on-site tipping rain bucket:
1.From Laguna desktop, click on the Setup drop-down. Select Controller.
2.Locate the “Microclimate” section and un-check the “Use same Microclimate . . “ box.
3.Use drop-downs to select each source for ET, Rain and Wind. Weather devices must be created in Setup-Weather.

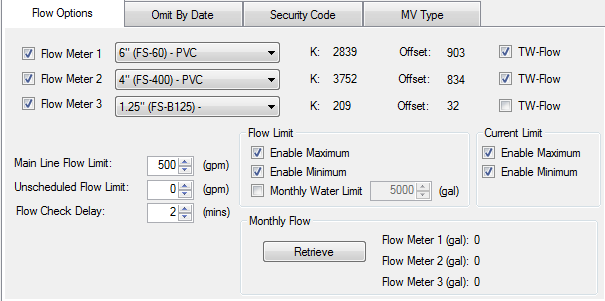
Flow Meter Setup
A DX3 controller can have upto 3 flow meters. The flow sensors can be setup as either conventional or 2-wire. The TW-Flow check-box allows to set up the flow sensor as a 2-wire flow sensor.
Set Flow Meter Size(s)
1.From Laguna desktop, navigate to the Setup drop-down
2.Select Controller
3.On Controller Setup desktop, select target controller
4.(optional) Click on GET SETUP to find current settings
5.Determine which Flow Meter input is being used at the controller and check the box to activate (Flow Meter 1, Flow Meter 2 or Flow Meter 3 (DX3 only)
6.From the drop-down box, select the correct flow meter.
7.The K and Offset values will be automatically populated
Note: If your flow sensor is not listed, contact Rain Master Tech Support for custom K and Offset values. These values can be saved for future use by creating a new Flow Sensor in Central Options.
Set Main Line Flow Limit
This setting will instruct the controller to alarm if the total flow observed during an automatic or manual event exceeds the capacity of the system to deliver adequate pressure. Recommend basing this setting on the POC size, pump or mainline size.
This setting will instruct the controller to alarm if flow is observed while there aren’t any manual or automatic cycles running (any activity started by the controller). Recommend setting to “0”, but can be set higher to accommodate manual functions, hose/QCV use or flow that can’t be regulated.
Set Flow Check Delay
This setting instructs the controller to wait for a period of time before actively checking flow against limits. Primarily used to allow mainline and lateral lines to fill and flow to settle at the start of a cycle. Recommend setting to 2 minutes.
Activate Upper and Lower Limits
1.From Laguna desktop, navigate to the Setup drop-down
2.Select Controller
3.On Controller Setup desktop, select target controller
4.(optional) Click on GET SETUP to find current settings
5.Check the box on both Enable Maximum and Enable Minimum
6.Click on SAVE AND SEND to send values to the controller.
From Laguna desktop,
1.Click on the Setup menu. Select Controller.
2.Check the TW-Flow check-box against each Flow Meter to set it up as a 2-wire flow sensor.
▪Enabled = 2-wire
▪Disabled = Conventional
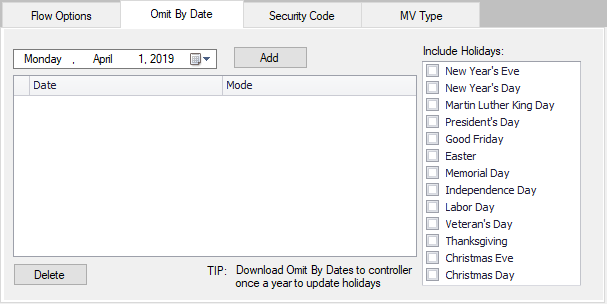
Omit By Date allows to select dates on which watering will not be scheduled.
A DX2 controller can have 15 omit dates whereas a DX3 controller can have upto 48 omit dates.
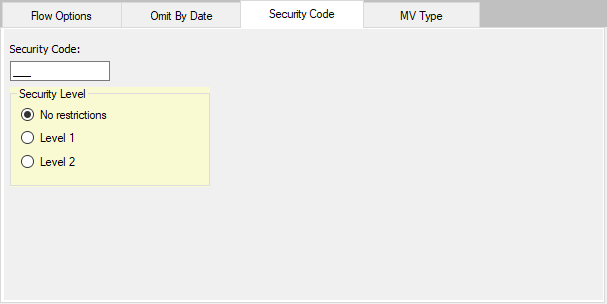
Security code is used to lock out unwanted changes or use at the controller from anyone not authorized to make changes or perform maintenance operations.
Level 1 locks out all functions until you enter the security code.
Level 2 will allow maintenance work(i.e. manual operations, review, etc.) but does not allow program changes.
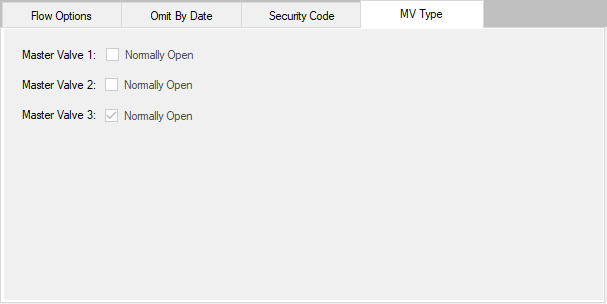
MV Type allows to set the three master valves to be either Normally Open or Normally Closed.
For a DX3 controller, the type for all three master valves can be modified.
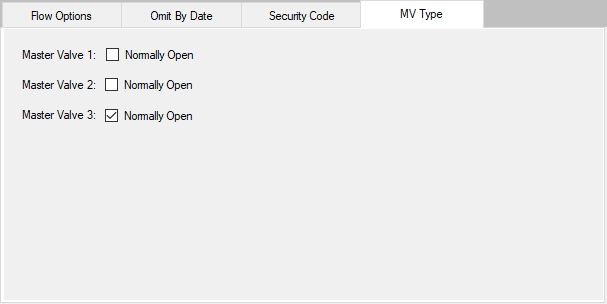
For a DX2 controller, by default Master Valves 1 and 2 are Normally Closed and Master Valve 3 is Normally Open and these settings cannot be modified.
When a new controller is created, the Specify Controller Address pops up and you can enter the Address, Name and Location for the new controller.
You can modify these properties by clicking on Modify in the Controller Setup form.
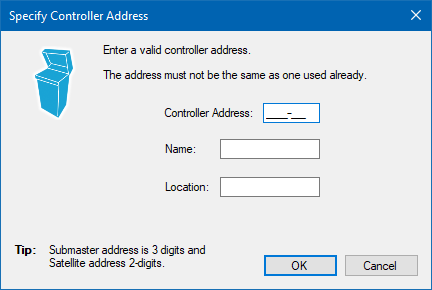
Submaster address ranges from 0 to 255.
TIP: Submaster address is 3 digits and Satellite address is 2 digits.
See Also